Building custom components
It’s not unlikely that when using manim-eng you will want to implement your own circuit symbols, especially given manim-eng’s current infancy. This page aims to guide you through the process of doing so, through the lens of building the resistor symbol.
Note
On this page I frequently use the term ‘mobject’ generally. The Component
base class expects that mobjects used to form component symbols will specifically be
VMobject
s. I use mobject as it is easier to read than vmobject, but only vmobjects may be
used to form component symbols.
Step 1: import the implementation API
First, import the standard and base classes. To avoid cluttering the global namespace,
the classes required to implement your own components are kept in the implementation
submodule.
from manim_eng import *
from manim_eng.implementation import *
Step 2: choose the right base class
While you can get along only using the Component class for all components you
wish to implement, it’s better to use the right base class for the job. This will ensure
consistency of API with the rest of manim-eng and allow you to focus on just building
your symbol.
The base class hierarchy looks something like this:
Your component can derive from any of these, but some are more appropriate for certain applications than others. The table below outlines the intended uses for each.
Base class |
Purpose |
|---|---|
Specialised components not handled by the subclasses below (currently most likely to be components with more than two terminals). |
|
Two-terminal components with rectangular symbol
footprints, such as resistors and inductors. Adds
|
|
Two-terminal components with square symbol
footprints, such as capacitors (and sources, but
these have the |
|
Source symbols (such as cells). Adds
|
|
Current source symbols. Adds a |
|
European current source symbols (with a vertical line). |
|
Voltage source symbols. Adds a |
|
European voltage source symbols (with a horizontal line). |
|
Specialised voltage source for building symbols for Randal Munroe’s baertty and battttttttttttery. |
|
Components with a single terminal, such as grounds and power rails. Removes the ability to set annotations, as monopole components do not support them. |
In our running example, we want to select the Bipole class, as a resistor is
a standard rectangular bipole.
from manim_eng import *
from manim_eng.implementation import *

class Resistor(Bipole):
    # read on...
Step 3: override the _construct() method
A component’s _construct() method works much the same as a Manim
scene’s construct() method.
Components should override this method and populate it with the code to build their
symbol.
Warning
This is contrary to Manim’s standard of performing symbol construction in the
__init__() constructor. This is done because the base constructor in
Component needs to set things up both before and after the component
structure is specified.
Step 3(a): call the superclass’ _construct() method
You need to make sure to call the superclass’ _construct() method as well, as some
of the base classes perform their own construction (as an example,
EuropeanVoltageSourceBase constructs a horizontal line). That gets us this
far…
from manim_eng import *
from manim_eng.implementation import *

class Resistor(Bipole):
    def _construct(self):
        super()._construct()
Step 3(b): build the mobjects representing the symbol
For a resistor, we want to construct a rectangle. The question, though, is what its dimensions should be and where it should be placed.
We’ll first consider the second question. manim-eng symbols are always taken to be centred on the origin of their construction (much like Manim mobjects). However, there is a difference: manim-eng components take their centre to be the position of their centre anchor, and not the geometric centre of the symbol. To illuminate this, consider the example of an inductor. The symbol is not central on the centre anchor, but rotates around its centre anchor (purple below).
So, to bring it back to our resistor: our rectangle should be centred on the origin.
from manim_eng import *
from manim_eng.implementation import *

class Resistor(Bipole):
    def _construct(self):
        super()._construct()
        box = Rectangle()
Now, what size should it be? Well, manim-eng has a series of standard sizes for
components, configured via its configuration system. If you’re building a symbol that
conforms to a certain size category, you should make it thr right size. In our case,
a resistor is a standard bipole (i.e. it has two terminals), so we care about the
bipole_width and
bipole_height lengths.
Combining these, we can get a rectangle in the right place with the right size:
from manim_eng import *
from manim_eng.implementation import *

class Resistor(Bipole):
    def _construct(self):
        super()._construct()
        box = Rectangle(
            width=config_eng.symbol.bipole_width,
            height=config_eng.symbol.bipole_width,
        )
Step 3(c): match the style of the mobjects
manim-eng uses different stroke widths for different parts of components (most notably, symbols and wires use two different thicknesses). On top of this, we need to maintain support for other customisations passed to components that go all the way up to their mobject constructors. This requires that mobjects constructed as part of a component symbol be ‘matched’ to their parent mobject.
For simple symbols, this is easily done using the match_style() method on all
VMobjects.
This essentially copies over the key styling attributes from one mobject to another.
from manim_eng import *
from manim_eng.implementation import *

class Resistor(Bipole):
    def _construct(self):
        super()._construct()
        box = Rectangle(
            width=config_eng.symbol.bipole_width,
            height=config_eng.symbol.bipole_width,
        ).match_style(self)
In more complex cases, you may need to exercise more judgement and copy parameters over more conservatively (especially when considering fills).
Step 3(d): add the mobjects to the component body
The Component base class places the label and annotation anchors
automatically based on the shape of the component. To avoid terminals influencing these
calculations, Component needs to be able to differentiate between the
component body and its terminals. As such, it maintains two
VGroups, one
for the body (_body) and one for the terminals (_terminals).
All this is to say that when adding mobjects to form a component’s body, they should be
added to self._body:
from manim_eng import *
from manim_eng.implementation import *

class Resistor(Bipole):
    def _construct(self):
        super()._construct()
        box = Rectangle(
            width=config_eng.symbol.bipole_width,
            height=config_eng.symbol.bipole_height,
        ).match_style(self)
        self._body.add(box)
If we now append some basic visualisation code, we see exactly what we want!
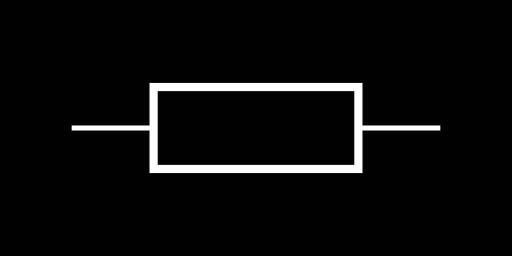
Note
The extra visualisation code is as below.
config.frame_width = 2.5
config.pixel_width = 512
config.pixel_height = 256

class ResistorExample(Scene):
    def construct(self):
        r = Resistor()
        self.add(r)
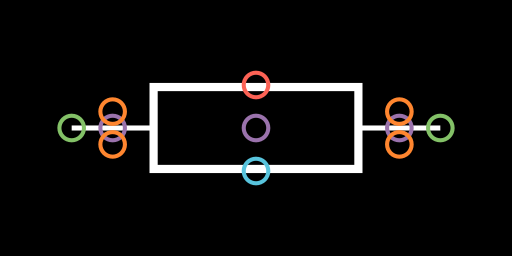
Finally, we visualise with the debug mode enabled, to see that the label (red) and annotation (blue) anchors have been correctly automatically placed on the top and bottom of our component.
Using modifiers to avoid duplication
The symbol modifiers
Standard component symbols can be modified in a number of ways to indicate an additional
quality (such as a diagonal arrow indicating variability). To avoid coding these
repeatedly, manim-eng defines them as separate base classes that you can inherit from
as well as the base symbol. These have special _construct() methods that
interrogate the shape of the symbol created and then intelligently place the modifier
symbol over the top.
Important
For modifiers to be able to work intelligently based on the component symbol size,
it is essential that the component body be placed in self._body and that the
modifier be inherited from first (as the way Python resolves calling a tree of
super()._construct() calls will then mean that its _construct() method will
be called after that of the base symbol.
There are two general-purpose modifiers currently provided by manim-eng: the
SensorModifier (a ‘bent L’) and the VariableModifier (a diagonal
arrow). Let’s look at what these look like when applied to our resistor from above.
The additional code is
class Thermistor(SensorModifier, Resistor):
    def _construct(self) -> None:
        super()._construct()


class VariableResistor(VariableModifier, Resistor):
    def _construct(self) -> None:
        super()._construct()
and the resulting symbols are
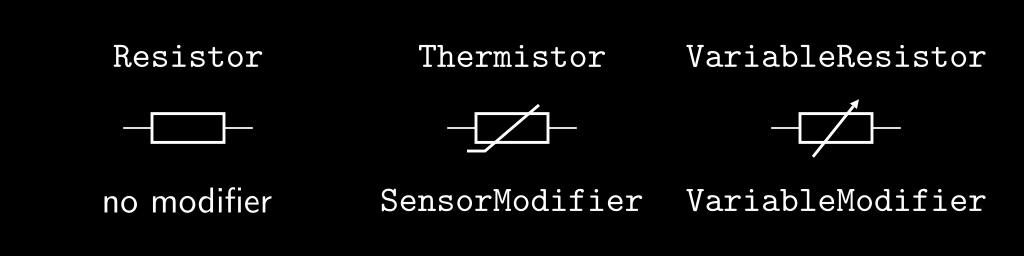
You may recognise these as a resistor, a thermistor, and a variable resistor. In fact,
this is precisely how manim-eng’s Thermistor and VariableResistor
classes are defined!
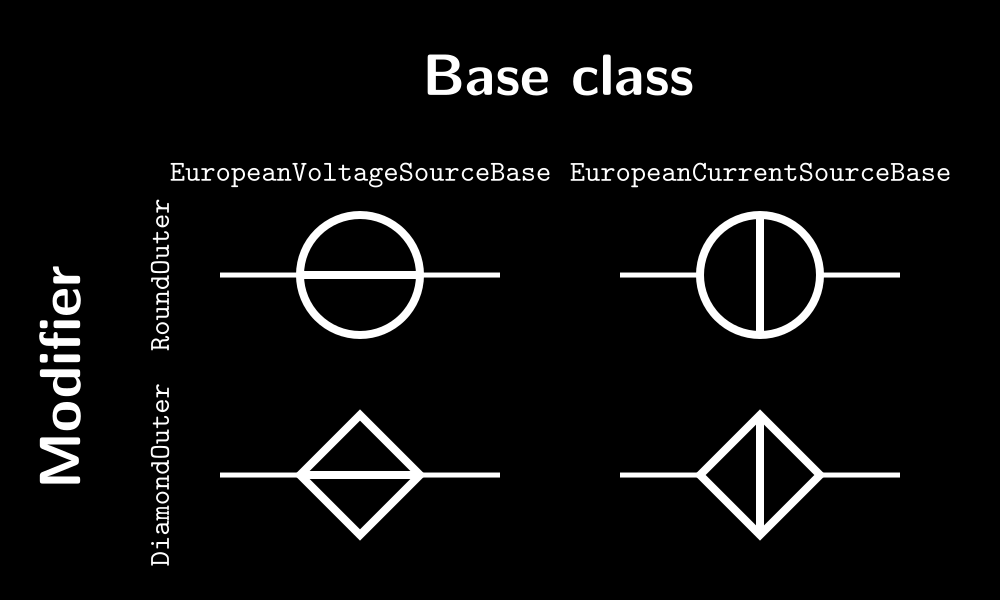
The outline modifiers
manim-eng also has two outline modifiers, which add either a circular (in the case of
RoundOuter) or a diamond (in the case of DiamondOuter) outline of
a size commensurate to a square bipole (that is, using the
square_bipole_side_length configuration value). These
are used to allow sources to be built in a duplication-minimal way, as the image below
should hopefully illuminate.